
How to Add Liquidity to a Solana Token on Raydium: Step-by-Step Guide
Learn how to add liquidity to a Solana token on Raydium using DEXArea. This guide covers pool preparation, adding balanced liquidity, LP tokens, liquidity locking, impermanent loss, and post-launch safety checks.

Adding liquidity is the moment your Solana token becomes tradable in a real market. Before that, you may have a mint address, metadata, a logo, and a launch plan, but traders still need a pool where they can buy and sell.
This guide explains how to add liquidity to a Solana token on Raydium using DEXArea. It covers what you need before adding liquidity, how Raydium pools work, how LP tokens work, how to avoid common mistakes, and when to lock or burn liquidity.
Use this article if you already have a Solana token and want to:
- Add liquidity to an existing Raydium pool
- Increase liquidity after launch
- Understand LP tokens before locking or burning them
- Prepare your token before opening trading
- Use DEXArea's Solana liquidity tools without writing code
Not Financial Advice
This guide explains the technical process of adding liquidity to a Raydium pool. It is not financial or investment advice. Liquidity provision can expose you to price volatility, impermanent loss, smart contract risk, and total loss of deposited value.
👉 Ready to add liquidity? Use the DEXArea Add Liquidity tool.
TL;DR: How to Add Liquidity to a Solana Token on Raydium
To add liquidity to a Solana token on Raydium:
- Create or identify an existing Raydium pool for your token pair.
- Make sure your wallet holds both sides of the pair, such as SOL and your SPL token.
- Keep enough SOL for network fees and token account operations.
- Open the DEXArea Add Liquidity tool.
- Connect your wallet and select the correct network.
- Enter or select the Raydium pool.
- Input one side of the deposit.
- Let DEXArea calculate the matching paired amount.
- Review the pool details, estimated fees, balances, and risk warning.
- Sign the transaction in your wallet.
- Verify the received LP tokens and monitor your pool.
What Adding Liquidity Means on Solana
A Solana liquidity pool is an on-chain reserve of two assets. Traders swap against that reserve instead of waiting for a traditional buyer or seller.
For a token launch, a common Raydium pool pair is:
SOL / YOURTOKENUSDC / YOURTOKEN
When you add liquidity, you deposit both assets into the pool. In return, you receive LP tokens, which represent your share of that pool.
For example, if you add SOL and your token into a Raydium pool, traders can use that pool to buy your token with SOL or sell your token back into SOL. The pool price changes based on the current reserves and trades flowing through the pool.
This is why liquidity matters. Without enough liquidity, even small trades can create high slippage. With better liquidity, users can trade with less price impact. Amazing how markets prefer not being held together by two coins and a prayer.
Raydium Pool Types: What Token Creators Should Know
Raydium supports different pool models on Solana. For most token creators, the important thing is to know which pool type your liquidity tool supports and what kind of market you are trying to create.
Standard AMM / CPMM Pools
These are common choices for new token markets. They are usually easier for token creators to understand because liquidity is distributed across the pool's price curve.
Use this type when:
- You are launching a new SPL token
- You want a simple token/SOL or token/USDC market
- You want traders to access the pool through Raydium and aggregators
- You do not need advanced concentrated liquidity management
Concentrated Liquidity Pools
Concentrated liquidity can be more capital efficient, but it requires more active management. Liquidity is placed inside a price range. If the price moves outside the range, your position can stop earning fees until it is adjusted.
This can be useful for more advanced projects, but it is usually not the easiest starting point for a basic token launch.
Stable or Correlated Asset Pools
Pairs involving stable or correlated assets may reduce volatility compared with very speculative pairs, but they still carry risk. Stablecoin pairs are usually more relevant to mature assets than brand-new meme tokens.
Before You Add Liquidity: Preparation Checklist
Do not add liquidity until the basics are clean. Liquidity makes your token tradable, but it also makes mistakes visible and expensive.
1. Confirm the correct token mint
Before adding liquidity, verify:
- The token mint address is correct
- The token name, symbol, and logo are final
- You are not using an old devnet or test mint
- Your community, website, and socials all point to the same mint
2. Confirm metadata
Token metadata should be complete before you add liquidity. Traders often check token name, symbol, image, description, and social links before buying.
3. Review mint and freeze authorities
Authority settings are one of the biggest trust signals for Solana tokens.
Before adding liquidity, review:
- Mint Authority: Can new tokens still be minted?
- Freeze Authority: Can token accounts still be frozen?
- Update Authority: Can metadata still be changed?
For many public launches, creators revoke mint authority and freeze authority to reduce trust concerns. You can use:
Do not revoke an authority unless you understand the consequence. Some actions are permanent. Blockchain systems, in their charming little way, do not care that you changed your mind five minutes later.
4. Prepare both sides of the pool
To add liquidity, you need both assets in the pair.
SOL / YOURTOKEN pool, your wallet needs:- SOL
- Your SPL token
- Extra SOL for transaction fees
USDC / YOURTOKEN pool, your wallet needs:- USDC
- Your SPL token
- Extra SOL for transaction fees
The deposit is based on equal value, not equal token amounts. If the pool price says 1 SOL equals 1,000,000 of your token, the liquidity deposit must follow that ratio.
5. Keep a SOL fee buffer
Keep extra SOL in your wallet before launching. You may need SOL for:
- Transaction fees
- Associated token account creation
- Priority fees
- Failed transaction retries
- Additional post-launch actions
For pool creation, costs can be higher than simple liquidity adds. For adding liquidity to an existing pool, fees are usually lower, but you should still keep a buffer so your transaction does not fail at the worst possible moment, which is apparently a popular hobby among blockchains.
How to Add Liquidity with DEXArea
DEXArea gives token creators a guided interface for adding liquidity to Raydium pools without writing code.
Step 1: Open the Add Liquidity tool
Connect a Solana wallet such as Phantom, Solflare, Backpack, or another compatible wallet.
Choose the correct network:
- Mainnet for real token liquidity
- Devnet for testing and dry runs
Testing on devnet first is strongly recommended if you are new to Raydium pool operations.
Step 2: Load the Raydium pool
If your pool already exists, load the correct Raydium pool in the tool.
Depending on the current interface, this may involve pasting a pool ID or selecting an available pool. Always confirm that the loaded pair matches the token you intend to support.
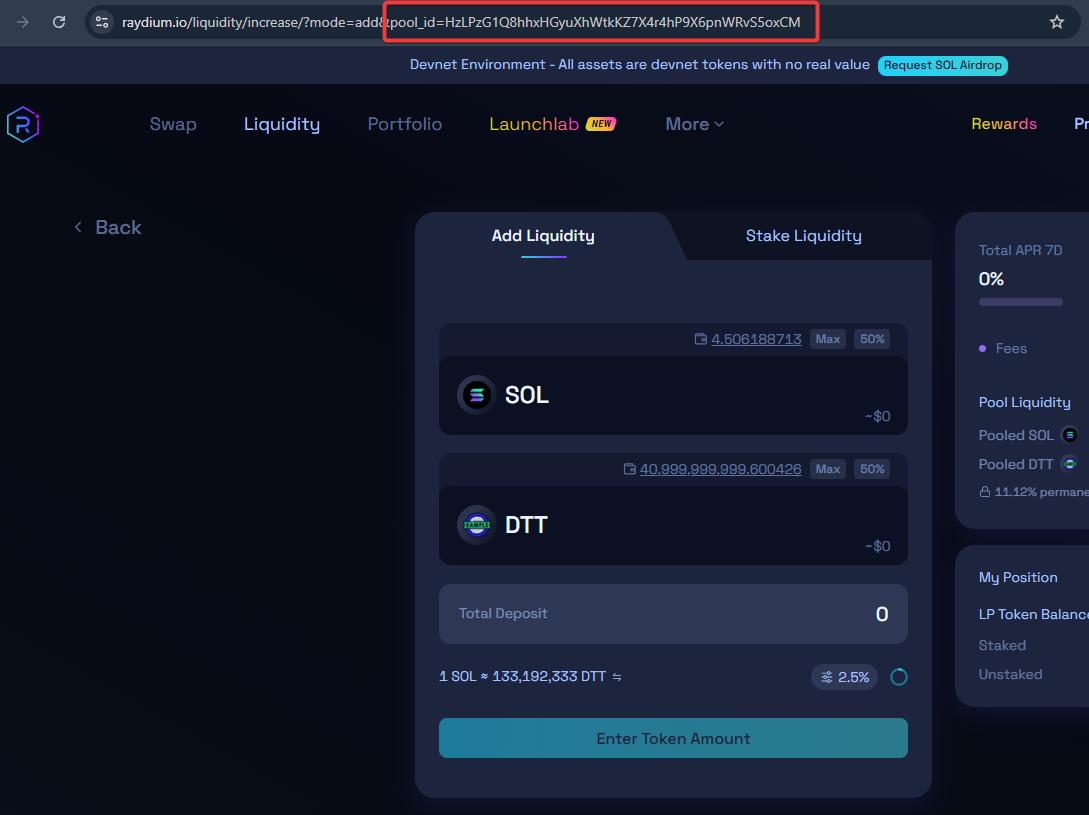
Example of finding a Raydium pool ID before adding liquidity.
Check:
- Pool pair
- Pool type
- Token mint addresses
- Current price ratio
- Wallet balances
- Existing LP balance
If the pair is wrong, stop. Sending liquidity into the wrong pool is not a UX problem. It is a money problem.
Step 3: Enter the liquidity amount
Enter one side of the deposit, such as SOL or your token amount.
DEXArea calculates the matching amount for the other side using the current pool ratio.
For example, if you enter a SOL amount, the tool estimates how many of your tokens are required. If you enter your token amount, the tool estimates the matching SOL or USDC required.
This helps avoid unbalanced deposit errors and makes the Raydium liquidity process easier to understand.
Step 4: Review pool information
Before signing, review the pool information panel.

Look for:
- Correct token pair
- Correct network
- Correct pool type
- Your token balance
- Your SOL or USDC balance
- Estimated deposit amounts
- Estimated transaction fees
- Any price impact or risk warning
Do not sign until every field makes sense.
Step 5: Sign the transaction
Click Add Liquidity, review the wallet popup, and sign the transaction.
DEXArea is non-custodial. Your wallet signs the transaction client-side, and the transaction executes on Solana against the relevant Raydium pool. DEXArea does not hold your private keys or take custody of your funds.
After confirmation, you should receive LP tokens representing your share of the pool.
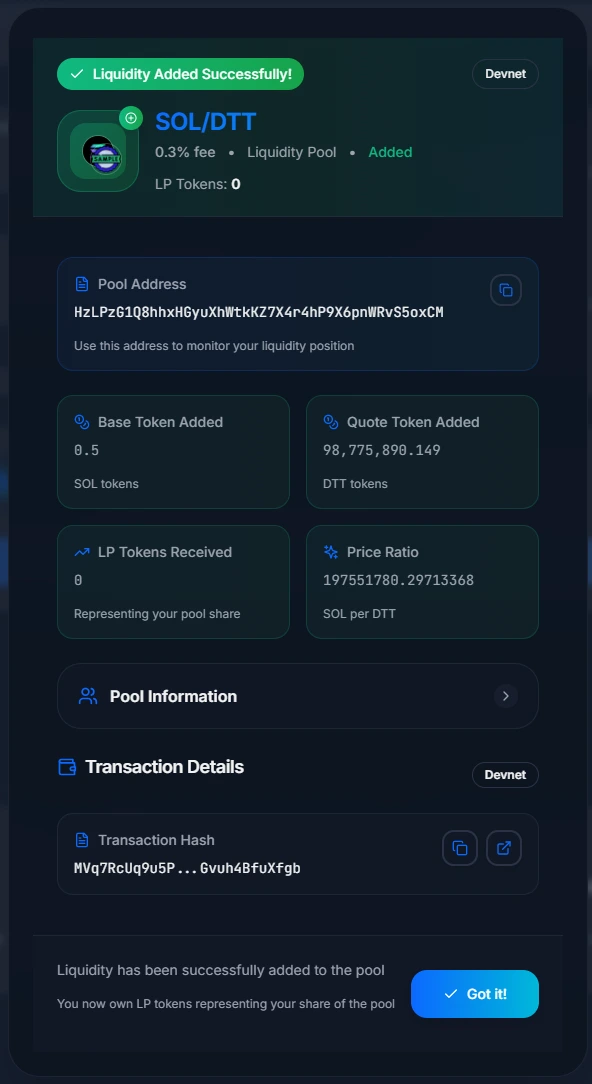
Step 6: Verify the result
After adding liquidity, verify:
- The transaction signature on a Solana explorer
- Your LP token balance
- The pool liquidity on Raydium
- The pool page on trackers such as DexScreener or Birdeye, if available
You can also use DEXArea's related tools to manage the position:

How Much Liquidity Should You Add?
There is no universal amount that fits every token. The right amount depends on your launch size, expected trading activity, tokenomics, and risk tolerance.
However, the important principle is simple:
Too little liquidity creates high slippage and makes your token look fragile. Too much liquidity can expose your treasury to unnecessary market risk.
When planning initial liquidity, consider:
- Expected buy and sell size
- Market cap at launch
- Whether the pair is SOL or USDC based
- How much treasury you can afford to risk
- Whether LP tokens will be locked, burned, or managed
- Whether you plan to add liquidity gradually
A tiny liquidity pool may attract bots and scare real buyers. A larger pool may improve trading conditions but ties up more value. Pick based on your project structure, not because someone on Telegram typed a confident number with twelve emojis.
LP Tokens Explained
When you add liquidity to a Raydium pool, you receive LP tokens. These are not bonus tokens. They are receipts.
LP tokens represent your claim on a share of the pool. If you hold them, you can usually remove liquidity later. If you transfer them, the recipient may control the ability to withdraw that liquidity. If you burn them, the liquidity becomes permanently locked because the receipt is destroyed.
This is why LP tokens matter so much for trust.
If you keep LP tokens
You can remove liquidity later. This gives flexibility but also means users may worry that the team can pull liquidity.
If you lock LP tokens
You keep the possibility of future access, but only after a defined unlock time. This can be useful if you expect migrations, upgrades, or treasury management needs.
If you burn LP tokens
You permanently destroy the LP tokens. This is the strongest liquidity lock signal, but it is irreversible.
Should You Lock or Burn Liquidity?
Many Solana token buyers check whether liquidity is locked or burned before buying. The reason is simple: if the creator can remove all pool liquidity at any moment, buyers face serious exit risk.
Burning LP tokens
Burning LP tokens means you permanently remove your ability to withdraw that liquidity.
Benefits:
- Strong trust signal
- Simple to verify
- Reduces rug-pull concerns related to liquidity removal
Tradeoffs:
- Irreversible
- No future treasury flexibility
- Cannot migrate that liquidity later
Locking LP tokens
Locking LP tokens means they are held by a locker or timelock until a future date.
Benefits:
- Trust signal with more flexibility than burning
- Public lock proof can be shared
- Useful if future migration may be needed
Tradeoffs:
- Users must trust the lock mechanism
- Liquidity can become withdrawable after unlock
- More complicated than burning
Neither option guarantees token success. Locking liquidity does not make bad tokenomics good. It only removes or reduces one specific risk.
Risks of Adding Liquidity
Adding liquidity is useful, but it is not safe by default. Here are the major risks.
Impermanent loss
Impermanent loss happens when the value of your LP position becomes lower than simply holding both assets separately. It usually appears when one asset moves strongly against the other.
If your token rises sharply, the pool sells some of it into the quote asset. If your token crashes, the pool can leave you holding more of the weaker asset. Fees may offset some losses, but they do not guarantee profit.
Token price collapse
If your token loses most of its value, your LP position may also lose most of its value. Adding liquidity does not protect you from market collapse.
Smart contract and protocol risk
Raydium pools operate through on-chain programs. Any DeFi protocol can carry technical risk, integration risk, or unexpected behavior. Use known tools, verify addresses, and test before committing meaningful value.
Wrong pool or wrong mint
This is a very common operational mistake. Always verify the mint address and pool pair. A fake token with the same name or symbol can still be a completely different mint.
Active authorities
If mint authority remains active, the supply can be increased. If freeze authority remains active, accounts may be frozen. Some traders treat active authorities as risk flags.
Review authority status before adding serious liquidity.
Common Mistakes When Adding Liquidity
Avoid these before launch:
Mistake 1: Creating liquidity before metadata is final
Wrong logo, wrong symbol, or missing metadata can reduce trust. Fix metadata first.
Mistake 2: Adding liquidity to the wrong pool
Always confirm the pool ID and token mints. Token names are not enough.
Mistake 3: Not keeping enough SOL
You need extra SOL for fees and account operations. Do not run your wallet down to zero.
Mistake 4: Forgetting LP tokens control withdrawal
If LP tokens remain in the creator wallet, users may assume liquidity can be removed.
Mistake 5: Burning LP tokens too early
Burning LP tokens is permanent. If you may need migration or treasury flexibility, consider whether a time lock is more suitable.
Mistake 6: Ignoring price impact
Thin liquidity creates large price movement on small trades. That can make charts look broken and scare users away.
Mistake 7: Launching without a security checklist
Before adding liquidity, review mint authority, freeze authority, metadata authority, supply, token distribution, and official links. Use the relevant DEXArea tools before public launch.
Recommended Token Launch Flow
For a cleaner Solana token launch, use this sequence:
- Create the token with DEXArea Token Creator.
- Confirm metadata with View Metadata.
- Update metadata if needed with Update Metadata.
- Revoke or transfer risky authorities where appropriate:
- Create the Raydium pool with Create Pool.
- Add liquidity with Add Liquidity.
- Lock or burn LP tokens if that matches your launch plan.
- Track holders with Snapshot Token Holders.
- Distribute tokens with Token Multisender if needed.
- Monitor liquidity and trading activity after launch.
This sequence gives users, traders, and scanners fewer reasons to distrust your token. Which is helpful, because crypto users already arrive with the emotional posture of someone checking a suspicious USB drive.
FAQ: Adding Liquidity to a Solana Token on Raydium
How do I add liquidity to a Solana token on Raydium?
Do I need to create a pool before adding liquidity?
What assets do I need?
SOL / YOURTOKEN pool requires SOL and your token. A USDC / YOURTOKEN pool requires USDC and your token. You also need SOL for transaction fees.Why does the tool calculate the second token amount automatically?
Liquidity must follow the pool's current price ratio. You usually deposit equal value on both sides, not equal token amounts. DEXArea calculates the paired amount to help prevent invalid or unbalanced deposits.
What are LP tokens?
LP tokens are receipt tokens that represent your share of the liquidity pool. Holding LP tokens usually lets you remove liquidity later. Burning or locking LP tokens limits or removes that ability.
Can I remove liquidity later?
Should I burn my LP tokens?
Burning LP tokens can improve trust because it permanently locks the liquidity. But it is irreversible. Do it only if you are certain you will not need to remove or migrate that liquidity later.
Is adding liquidity profitable?
Not necessarily. Liquidity providers may earn trading fees, but they can also lose value through impermanent loss, token volatility, or price collapse. Fees do not guarantee profit.
How much liquidity should I add at launch?
There is no universal number. Add enough liquidity to support expected trading with reasonable slippage, but do not risk more treasury value than your project can afford to lose.
Can I test this before mainnet?
Yes. Use devnet when available to test the process with no real value tokens. For production launches, always verify the network before signing.
Final Checklist Before Adding Liquidity
Before signing the transaction, confirm:
- Token mint address is correct
- Metadata is final
- Pool pair is correct
- Network is correct
- Wallet has both assets
- Wallet has enough SOL for fees
- Mint and freeze authorities have been reviewed
- You understand LP tokens
- You have a plan for locking, burning, or managing LP tokens
- You understand impermanent loss and market risk


